Release Notes
v1.1.0-beta
Introduction
This release enhances performance and functionality across key nodes such as Generator, Guide, Clump, Noise, and Trim, with significant speed improvements, undergoing multiple redesigns over a 14-month period for enhanced performance. New nodes like, Scale, Resample Hair, and Curves to Splines have been added.
A manual Freezing System minimizes redundant calculations, improving sculpting processes and procedural modeling speed.
Users can now sculpt directly on frozen Guides and set up animated surface deformation more easily.
Additionally, a new Dynamics node introduces experimental physics simulation capabilities, offering users adjustable parameters for gravity, stretchiness, damping, stiffness and collision.
Various structural UI design improvements have also been implemented.
Freezing System
Manual freezing of generated splines (hair follicles) within the Generator now minimizes redundant calculations, providing a substantial performance boost by eliminating the need for repeated spline generation on each dependency graph update. The Freezing System extends to Guide, Noise, Curl, and Curves to Splines nodes, making the hair deformation during sculpting and procedural modeling faster.
- Freezing - Sculpt on Frozen Guides
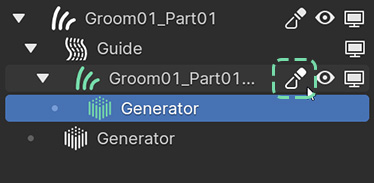
Users can now sculpt directly on frozen Guides. Once splines are distributed on the Guide object, entering sculpt mode via the Sculpt Mode Toggle button This action freezes the Generator, rendering most parameters inaccessible (grayed-out).
- Freezing - Key Features
Sculpting: Ability to sculpt on frozen splines.
Single generation: Splines can be generated and “made real”.
Faster animation and simulation: Freezing splines in the Generator and subsequent freezing of nodes like Guide and Noise makes the animation playback as well as the simulation faster. (Requires testing)
Reduced calculation times: Precalculated attributes are automatically stored on Hair and Guide objects upon freezing selected nodes, eliminating repetitive noise or interpolation algorithm computations. (Requires testing)
Note
Scene size significantly increases due to the frozen splines being “baked” directly into the hair object, rather than being procedurally generated. This is particularly the case in scenarios with multiple Medusa Nodes’ grooms containing hundreds of thousands of splines.
Simulation (Experimental)
A new Dynamics node has been introduced, utilizing a physical dynamics solver using Verlet Integration. While not entirely realistic, it provides functionality comparable to simpler game physics engines.
- Dynamics - Key Features
Users have the ability to adjust various parameters such as gravity, stretchiness, damping, and stiffness using different Mask Groups.
Additionally, enabling the Collision with Emitter Object option allows users to choose between the emitter object or specific mesh objects within a designated Collision collection.
Furthermore, the physics simulation accounts for surface deformations of the emitter object, ensuring that changes in its surface influence the simulated hair accordingly.
Medusa Nodes update on the horizon! New additions include custom geometry nodes physics solver with collision, and shape preservation options. #MedusaNodes #Blender #geometrynodes pic.twitter.com/hr2jBVnB0I
— Irakli Kupunia (@KupuniaIrakli) February 1, 2024
Note
Please keep in mind that the Dynamics node is experimental and may exhibit some bugs.
Speed Improvements
Comparison with Blender
While improving Medusa Nodes’ performance in relation to the addon’s previous version is valuable, the real significance lies in comparing it with Blender’s new geometry nodes based hair system and its versatile nodes. These systems are quite different, and comparisons of such kinds sometimes tend to highlight obvious advantages of one system over the other, while simultaneously leaving out the shortcomings.
With that said, the comparison tests shown below only highlight a part of both systems, particularly the distribution and interpolation.
- Comparison with Blender - Differences
The way Medusa Nodes works internally is quite different from native hair nodes in Blender.
- Blender
Blender’s Interpolate Hair Curves
 modifier is responsible for simultaneous distribution and interpolation of hair curves.
The modifier offers two distribution methods: Random Distribution and Poisson Disk Distribution, the latter being slower but also more accurate as it mimics the organic distribution of hair follicles on skin.
The modifier can account for length, shape, and point count of parent curves in close proximity. This is quite artist-friendly, as users don’t really have to think about point count.
- Medusa Nodes
In Medusa Nodes, the distribution and interpolation are split up into two different modifiers: Generator and Guide.
The Generator
 modifier is responsible for the distribution of hair follicles. Both of the above distribution methods are present here as well (additionally, there are 2 more methods of distribution: Exact Amount Distribution and Distribute on Vertices).
The Guide
 modifier interpolates the length and shape of parent curves in close proximity. It does not account for differences in point count. It automatically sets the same point count for each and every spline.
Fortunately, partially because of this lacking functionality, animated surface hair deformation as well as hair curves sculpting can calculate faster.

Chart 1 |

Chart 2 |
Chart 1: 30 FPS. 30 Frame animation with Iso sphere geometry used as an emitting surface. Both of the setups use same amount of randomly distributed guiding splines (59)
Chart 2: 30 FPS. 30 Frame animation with Iso sphere geometry used as an emitting surface. Both: Blender hair Curves Object and Medusa Nodes Hair object of the setups use same amount of randomly distributed guiding splines (59)
Surface Deformation
Enabling hair deformation based on animated surfaces deformation has been a highly requested feature, previously lacking and cumbersome to configure.
Now, surface deformation is easily activated by selecting the Surface Deform option in the Generator (ensure to enable it on the Guide Object’s Generator as well).
Note
Surface Deform option has some additional calculation overhead; avoid enabling it unless necessary.
New Nodes
New Utility nodes, such as Curves to Spline, Mirror, Scale, and Resample Hair, have been added. These nodes might be useful in some specific scenarios.
Node Improvements
- Generator Node
The freezing system caches generated splines and allows sculpting.
Speed improvements are observed with the Generator’s Poison Disk Distribution, especially when used with frozen splines.
Additionally, the Interpolation Object option has been added.
- Interpolation Object Option
Now, users can select an interpolation object within the scene, enabling the generation of splines replicating the shape and length of the chosen hair object.
- Clump Node
The Clump deformer properties have been reorganized in an upgraded sub-panel UI, improving user experience.
Now it efficiently distributes higher amounts of clumps, reducing calculation times.
Introducing Clump Cell Randomness brings variability to clump thickness for a more realistic appearance.
The Volumize parameter in the Misc sub-panel mimics Blender’s Clump Hair Curves modifier’s clump shape.
- Guide Node
The Guide deformer now calculates faster, particularly when used with Region Maps (testing required).
Freezing stores pre-calculated data, enabling faster hair deformation processes.
Improved Groom Initialization
The initial New Groom pop-up displays approximate spline and control point counts, starting with a default distribution of around 10,000 splines for any chosen mesh geometry. Also, the thickness and length of distributed splines are calculated based on emitter geometry’s surface area and dimensions, allowing for better adaptability across various geometries.
UI and Functionality
The separation of the new Medusa Nodes Properties panel from the Medusa Nodes Hierarchy optimizes vertical screen space, enabling users to efficiently adjust parameters of larger nodes.
- Icons
New icons differentiate node types in both the Hierarchy and Properties panels, as well as in the Mask Group Options menu. Main hierarchy icons remain white, while secondary hierarchy icons are green, aligning with the default color of guides, for clear visual organization.